
Witch Hat
This was literally a case of "I need a Halloween costume for tomorrow, what do I have lying around?" I made it in 3 hours just figuring it out as I went along, you don't have to do that though.
Normally I play a little fast and loose with seam allowances but in this case you are going to want to be careful with them because you will be attaching a cone to the inside of a flat circle and it needs to be fairly precise or you may end up with a hat that won't fit or won't go together. It's not hard at all and I will point out all the 'gotchas' along the way. Don’t let the math spook you either.

As for supplies you are going to need a medium weight fabric, lightweight lining fabric, some tulle, some ribbon, some memory or other stiff wire, interfacing or fusible interfacing, and the usual sewing notions, (needle, thread to match fabric, pins, seam ripper, soft measuring tape, chalk or a soap chip or a tailors marking pencil,etc.). Oh and whatever you are going to want to decorate it with once done with the main hat. I like to use cotton velveteen for the main hat fabric but any medium weight fabric will do. You can use lighter fabric if you use extra interfacing in the cone. For the lining of the cone I usually use quilting cotton but use whatever you want or have on hand. This lining is not going to show when worn.
This is going to take about 1 and a half yards of fabric, depending on width.
First you need to measure your head where your hat should sit, mid-forehead and just above the ears. I’m using 21.5 inches for our example, and test, hat. This is the ultimate minimum size of the hole in the brim and the measurement we will be figuring the base of the cone from.
Flat Bit
For the brim you need 2 19 inch circles of the main fabric. You can make it a little bigger or smaller depending on your taste. Fold the fabric in haf making sure everything lines up with the wrong side of the fabric on the outside, put a weight in the center point of the fold and tie on a string the terminates with a little soap chunk or tailors chalk.

For the inner circles you need to take your head measurement, and find the radius of that circle. For this you need to do a little math. Let's call your head measurement x. Now divide x by twice pi which is roughly 6.283. For 21.5 this gives me a radius of 3.42 which I am rounding up to 3.5, we will call that y. We will be using y again!
Now the actual length of the radius you want to use is y - .5. This is to give you some seam allowance for attaching the cone.
This may seem conuter intuitive but you are better off with the hole being a bit too small because you can make it bigger, and also you need a little lip of fabric for your seam allowance to attach to the cone.

If the weight and string is vexing you, you can also use a yard or meter stick. Pivot it around the central point like anchoring the string and make small marks as you go every inch or two. It takes longer but it does work especially for short lengths like the inner cut out where the string can be really annoying.
Now put the 2 brim circles right side together and sew around the edges. If your fabric seems kind of light or you can see through the 2 layers, and you don’t want to see through it, you can also cut a circle of interfacing but this is completely optional and I would only do this if I was making the hat out of satin or lighter fabric.

Once brim is right side out carefully iron around the edges. If you are using a fabric with a pile like velvet just steam it while holding it flat so you don’t crush it. Make sure you are using the correct iron temp for your fabric. It is at this point you will very much notice if you didn’t sew it in a circle. If you have to rip some seams and redo that’s fine, it happens to us all and sewing in a circle like this can be tricky.
Once your brim is nice and tidy it’s time for the wire. You can use millinery wire, memory wire, or any stiff wire really. Wire from a hanger is probably too heavy and that will make the brim droop which would be sad. You want something about 16 gauge, and STIFF. Soft wire will deform, become misshapen and is more likely to break from being reshaped over and over. I can not stress enough that it needs to be stiff, firm and/or rigid, yes I know that’s somewhat redundant but this is important for your future happiness.
Cut the wire so it will sit just outside the very outer edge of your brim with about 3 inches overlap. Use pliers to make tiny loops on either end of the wire so it won’t want to poke through the fabric.

Once the wire is prepped you need to get it situated in the hat. You can twist it in a spiral motion to get it in or if it has a lot of spring curl it up just tight enough to get it in and let it go FOOP into place.
It is critical that the wire fill the entire inside edge of the brim. The fabric should be taught. You may have to reach inside and tighten it up and either twist the wire ends or wrap with a little thread or tape to keep them in place.
Pointy Bit
Now is time for the cone. If you want the gnarled version you want it tall enough to still have good height once it’s crinkled. If you just want a smooth cone you can make it shorter, it just depends on your preference.
If you aren’t sure how tall you want it make a brim and cone out of paper first and see how it looks on your head. Not necessarily a bad idea anyway!
I am making a gnarled hat, so I am going to use 20 inches. Fold the fabric length ways and put your weight on the folded corner and tie your pencil or soap chip to it with a 20-inch string. The bottom arc needs to be y times twice pi {6.283} which is your adjusted head measurement. Now add a half inch and divide by 2 you have your bottom arc length. Using a flexible tape measure you can measure this. A little tricky but you can do it. Remember measure thrice, cut once! Cut another of the same cones out of your lining fabric and one or two layers of interfacing. In this case the arc is 11.25.

If it’s fusible interfacing iron or steam it onto the wrong side of the fabric. If the main fabric is kind of light you might want use 2 layers. Sew the main fabric cone with the wrong side out using a quarter inch seam allowance, then do the same with the lining fabric. Turn the main cone right side out. You may want to iron the seam especially if you are going to make a smooth cone, but it may not need it. If it looks tidy it’s fine. Take the lining cone as is and insert it into the main cone matching the seams. Now you should have a seam inside and a matching seam outside.
At this point I would do a basting stitch around the bottom of the cone to keep the layers together. A basting stitch is a long-running stitch that’s easy to pull back out if you need to. Try the cone on to make sure it’s not too small. You might want to also baste around the center of the opening on the brim.
Now do another stitch right up and through the seam so the lining and the outer cone are connected and stable.

Now for the tricky bit, you need to attach the cone to the brim. If everything has gone according to plan the cone should fit so snugly into the brim that it actually makes the edge of the brim turn up a bit. That’s your seam allowance. Does the brim turn up a lot yet the cone fits your head? No problem go with that. If it just barely touches you can probably salvage it too since we will be putting a decorative band on the hat we can hide some crimes. If there is a big gap you need a bigger cone.
I would recommend pining the cone and the brim together before you sew, (you can also use small binder clips!). I hand sew the cone onto the brim since there is some geometry going on here and you may get some weirdness even if you pin first, that’s OK. Just do your best to attach it securely and if you can isolate the weirdness to the back where the seams are. After it’s attached turn the cone right side out and try it on. You may want to tack the seam flap up or sew a little ribbon over it if it’s a little loose to tidy it up but no one is ever going to see it so that’s up to you.

Here’s where the tulle comes in, apart from any you plan to decorate the hat with. You need enough to scrunch up and cram into the hat. Use just enough to help its keep shape. If your hat is a little too big some extra will help keep it sitting where it should on your head so no problem there. Yes you could use tissue paper for this but that makes crinkly noises that drive me batty. If you are doing the Gnarly version don’t put the tulle in till you have it scrunched down.
Gnarly
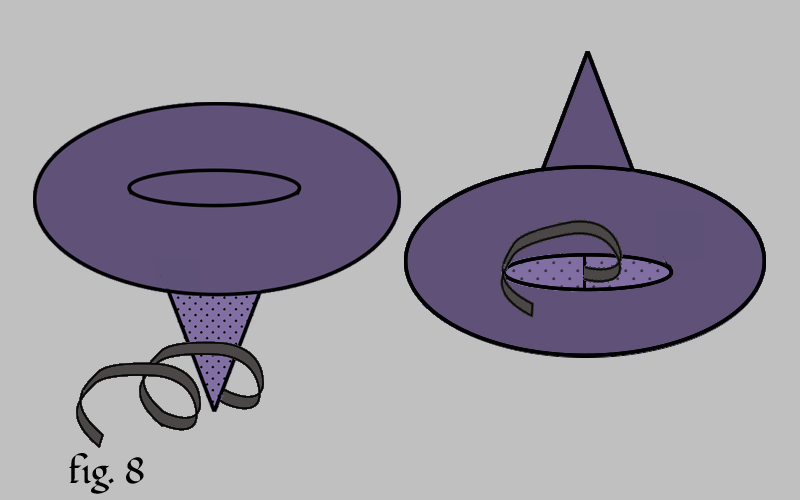
Now, ribbon, cut one piece a couple inches longer than your cone height, cut another at about 3 inches. Turn the cone inside out again. Sew the edge of the longer ribbon to where the seam is on the outside of the hat about 2 inches from the point, making sure that you get the outside seam involved even if you tacked down the lining… just for insurance. It needs to be very secure and pull on the lining and outside at the same time. Now turn it right way out again. At the bottom of that same seam sew the shorter ribbon. When you tie those 2 ribbons together you can do so in such a way that it scrunches the hat down. Super spooky. Stuff with your tulle to help it keep the perfect shape.
If you are happy with it as is you can just hop on your broom right now, but I like to put a little polish on my hats and fancy them up.
The minimum is putting a band around the bottom of the cone. You can use something as simple as wide velvet or satin ribbon or you can make a band with a fancier fabric.
Put the ribbon around the base of the cone right side down. Use straight sewing pins to pin the band together at an angle so it’s snug to the cone. You want to pin it so it hugs the slight slope of the cone and doesn’t bag too much. Slide it off, sew the seam and finish the edges.

If you are using ribbon you can also just put it around and make a nice bow.
For a fabric band you will want to cut 2 arcs like the one at the base of the cone and 2-3 inches wide depending on your taste.

Put the arcs wrong side together, and sew the long curved sides. Turn it right side out so the seam allowance in on the inside and iron it. Then put it around the base of the hat like in figure 9.
Tack the bottom of the finished band, ribbon or fabric,through the cone/brim seam like you did up the cone to hide the stitches and by just barely catching the bottom edge of the band. This will keep it in place and hide any booboos in that seam. Just sew it down in one spot, tie off, then do it again a few inches around. Once it’s tacked down you can consider any floof you may want or go as-is.
I like to put some floral stuff, bows, bats, a brooch or whatever on too. It really makes your hat unique, but hat decoration is a whole separate project!
I highly recommend you get or make some nice hat pins, the long kind, to hold your spooky chapeau in place while you zip around on that broom all night. They are also another great way to personalize.