
Big Floofy Net Skirt

This skirt, like the others, can be made without a sewing machine. It will take some time and patience, but it's really not very difficult to make.
You will lots of need net or tulle. 5 to 13 yards should be fine, (don't worry, the stuff is cheap!). If you are a larger goth, you may need more, however. I use the basic formula of waist size, doubled then divided by 13 is how much I'll need per layer in yards. My waist was 24" (when I originally wrote this), double that is 48 divided by 13 is 4.8, round it up... I need 5 yards of fabric per layer. I planed on making 2 passes, so I got 13 yards... more than enough. You will also need a package of blanket binding to match the net, and something like hem tape to pleat the net on. Get some hooks and eyes, and straight pins as well and needle and thread of course. If you get higher quality net or tulle it will cost more, of course, but that is up to you. You can also make it with stiff lace or organza though it probably won’t be as poofy.
Cut the hem tape to be 2 inches longer than your waist size. This is going to be the backbone of your skirt, and where the net will be pinned to.
If the net is very wide you can fold it in half long ways and get two layers with one run of pleats. Make sure the skirt is going to be the length you want it before you start pinning. If you want a shorter skirt you may have to cut the net lengthwise then fold it over.
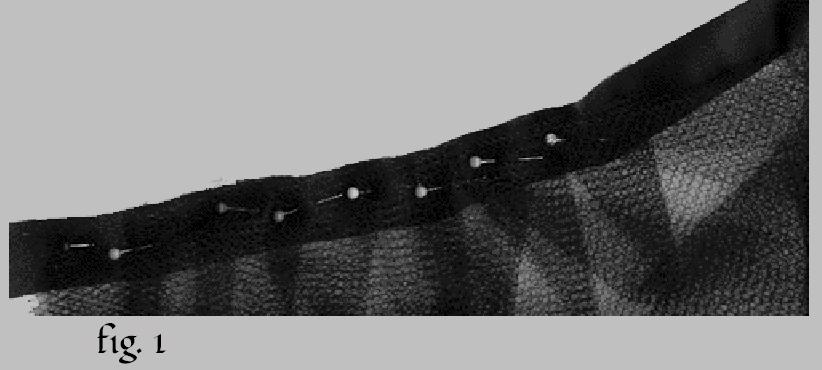
Start pinning the net to the hem tape starting an inch in from the ends. {fig.1} Make the pleats as even as possible. The smaller and more pleats you have (and the more fabric you use) the fuller and foofier the skirt will be. Once you have the first layer pinned, carefully trim the excess netting off.
Once you have it pinned, start stitching the net to the hem tape. If you are doing this by hand, make sure your stitches are small and even enough the sew the pleats flat. After you get finished start pinning your next layer, if you are doing more than one. I recommend at least 2 layers. Try to stagger the pleats so the folds are not right on top of each other so it lays better.
Once you have all your layers done, you'll want to cut the blanket binding about 2 inches longer that the hem tape. Fold about half an inch in on one side of the blanket binding, press it with an iron.
Fold it back over the way it came (ugly sides in) and press the crease back into that. Run a quick stitch up the edge to hold it together. {fig.3} Keep in mind that this will be the waist band, and as such will be visible. Make sure one side of your stitching is pretty and neat as it will show. Do the same for the other end, making sure the nice stitches are both on the same side.
Pin the blanket binding onto the skirt. The hem tape and pleats should be nicely sandwiched within the binding. Try to line the bottom of the hem tape with the binding, but so the tape does not show. Now you have to sew the binding on. make sure to do pretty neat stitches on the same side as the pretty end stitches are. In order to keep the binding from buckling make your stitches small, close together, and not too tight. Remember the binding should be a bit longer than the hem tape on one end, keep stitching to close the bottom of this end.
Now the tricky part, closing the skirt. You will have to sew the edges of the net together. You can do all layers in one seam, or do each layer independently... which I think makes it hang better. Line up the waist band with the ugly sides out. Start stitching a few inches below where the binding stops and the net starts. {fig. 3} You do this so you can get the skirt over your hips. How far down you need to start depends on your waist to hip ratio. Make this seam as neat and unobtrusive as possible, ESPECIALLY on the layer that will be the top layer.

Once you have this task done, you'll need to try the skirt on. Turn it inside out (so the pretty stitching is out ward and the seams are inward). Mark with a pin where you will need to put the hook and eye fasteners. Sew the hooks onto the overlapping bit of binding on the side facing you. The eyes (little loops) go on the outward facing side of the binding on the other side of the opening.

If you want this to have an underskirt, you can either sew some light fabric onto the hem tape with the pleats just like you do the net; or you can use a skirt you find in a thrift store removed from it's waist band and attached to the hem tape.
Want a bit of sparkle? Do this in an area where cleanup is easy... as this will make a mess! Get a set of those shallow aluminium disposable baking pans. Dump glitter in one, in the other spread out a layer of craft glue. Make sure it's the flexible kind for use on fabric. Gather the bottom of the skirt together, bunch it up tight so that you can get a good grip on it and have only the very edge poking out. Gently dip the edge of the hem in the glue, then dip it into the glitter. Move it a bit to make sure that the glue is covered, now pull it out, and let go. A shower of glitter will go everywhere, I warn you! Hang up the skirt to dry. make sure all the layers of net are separated out at the bottom so that they don't get glued together. You may have to toss on a bit more glitter on if any spaces were missed. Once it is dry you will have a sparkly accent at the bottom. This is especially neat if you wear another skirt over it, and the glitter just pokes out underneath.