
Long Vest

This is a really fun item to add to your wardrobe. The fuller version is great to dance in, and it can make an otherwise plain outfit something special. I have long vests made out of lace and velvet. The lace one is very full, I've also made one of these for a friend out of crinkle cotton, so almost any fabric will do. I recommend staying away from stretchy fabric, especially if you want to line it.
You will need to get 2-3 yards of fabric depending on how full you want your vest, how tall you are, and how wide the fabric is. I try to use 60" wide fabric, because if you use narrow fabric, you will have to cut the pieces lengthways rather that cross ways and that makes matching up velvet nap and lace patterns much trickier. If your fabric doesn't have a pattern or a nap narrow fabric is fine.
In addition to the fabric, you will need a t-shirt. Choose one that fits well, not too tight and not too loose as this will be your basic "pattern" for the vest. Fold the fabric in half with the 'wrong side' out. Lay the t-shirt on the fabric and draw an outline of the vest shape using the shirt as a guide with Tailor's pencil or soap. You may want to lay a yardstick down to get the sides straight. This is the back piece.

Be patient with this step. If it doesn't look even the first time you do it, draw the outline again before you cut. Remember to always cut too large rather than too small as it is easier to take it in than let it out. Cut the fabric at least an inch wider then you think you need it for seam allowance. If you don't feel comfortable diving right in with the fabric you want a vest out of, purchase some muslin or other cheap fabric to make a mockup version to be sure it will fit right.
Now use the first vest piece as a pattern for the second. This time lay it so once cut you will have 2 half pieces instead of one. This will be the front. If you got fabric that has a pretty selvedge (finished edge) you won't have to finish the front opening!

Now, sew the side and shoulder seams with the pretty side of the fabric on the inside. This can be done by hand or with a machine (much easier). Try it on, to make sure it is hanging well. You may want to get a friend to help you by pinning the hem up before you finish it. This will ensure that it is hanging evenly all around. After you have it pinned use a hem stitch to keep it in place. A hem stitch is long on the inside of the garment, and so short it barely shows on the outside. You will also want to finish the armholes, neck opening, and front opening of your vest the same way , unless you want to use trim of some sort. Of course if you made your vest out of fabric that unravels easily, it's a good idea to at least run a straight stitch along the bottom before you put the trim on.

Other finishing options include using ribbon or other trim around the open edges. On my lace vest, I used the pretty selvedge as trim around the bottom of the vest and satin ribbon around the arm holes and front. If you want it to close in front, you can use frogging, or just sew buttons down either side for effect.
If you want a fuller vest, get enough fabric to make a large triangle that you can insert in the back. Cut the back piece of the vest straight up the center, but not all the way to the top. Stop the cut where you want to start flaring, either from the center of your back, or your waist.
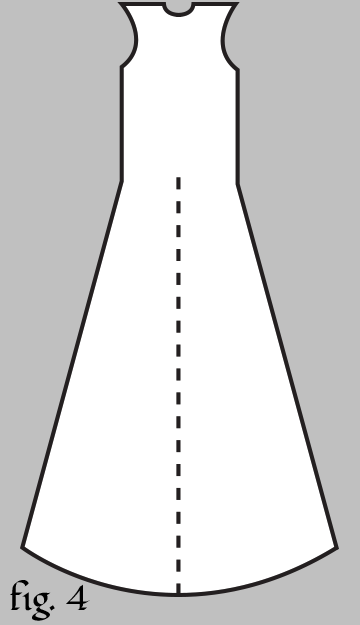
If you are worried about getting the cut for the gore in back straight you can always just make this in 4 pieces so there will be a seam up the back you can just use for the gore.
Make sure you cut triangle for the back panel, called a ‘gore’, so any pattern matches up as best you can, and so that velvet na lays in the same direction. I would suggest cutting it on the fold so it is symmetrical. The sides of the triangle will need to be the length of the cut in the back of the vest. Don't forget the seam/hem allowance. I find a more or less equilateral triangle with a slightly rounded bottom works best. The curve should follow that of the rest of the vest, which should be hemmed and trimmed so everything matches up once the panel is sewn in.
Setting in a gore can be tricky. If you end up with it looking a little weird at the point of the triangle fix it or, hide it! I almost always put an applique over the point because it also reinforces the fabric at that point.
Still not full enough? You can put gores in the side seams too. Do your side gores no more than half the width of the back gore or it may hang funny.

In order to line the vest use the pieces once cut out as a pattern for the lining. Make sure you lining fabric has the same stretch (preferably none) as the outside fabric. You also want it to be a lighter weight than the outside fabric. Sew the pieces of the lining together, and sew the lining to the main vest before hemming and trimming. Make sure the ugly side of the seams of both are facing each other and attach them around the edges. Use a loose stitch at first so you can make adjustments if it isn't wanting to hang well. Lining can be very tricky, so a little patience is in order here.