
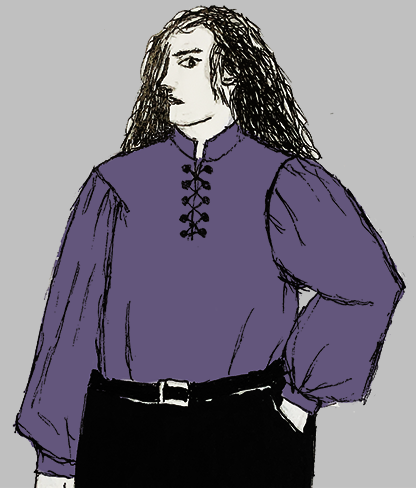
Pirate Shirt
While I wouldn't advise making this your first sewing project, it isn't as difficult as it might seem. As usual, the secret to completing this project successfully is patience and care. You will want to follow the "measure twice cut once rule" and make sure to pin everything before stitching. I suggest you baste (sew with long loose stitches to check fit) before you properly sew it together. I also suggest you make your first one out of cheap fabric, like cotton muslin. You can then take it apart and use the pieces to make as many shirts as you want.
I'm going to show you two versions, one with and one without ruffles, and multiple variations on those. There are many ways to be creative with this project, and whether you need something dead on period or something more fantastic for clubbing, this should get you started.This will not be the most taylored version you can make as I am trying to make this as simple as possible, but I have made many shirts like this that have served their owners well for years.
You will need tailor's chalk or soap, some straight pins, bias tape (and/or blanket binding). You will also need an iron and a board or you can iron on a wood or metal table on top of a thick bath towel. This project will probably about 3-4 yards of fabric, (if you want really poofy sleeves and a ruffle). If you are really tall or husky you will most likely need more, (this is a great project for goths of all shapes and sizes!). 45 inch wide fabric should be sufficient, but if you want ridiculously big sleeves or to make it a long tunic, use 60 wide fabric. If you are making this for a period event, use linen or silk, otherwise almost any fabric with a decent drape will do. I will caution that fabric that is too heavy won't really hang well, and it's much harder to make ruffels out of velvet that look good around the edges. At the same time, if the fabric isn't stiff enough... you'll have saggy ruffles and the sleeves won't have any body to them. You can also use lace for the ruffles, and this often saves you from having to finish the edges of the ruffles at all.
You will need a t-shirt (or other shirt) that has about the fullness you want from the body of the pirate shirt. If you want to make it more roomy than anything you currently own, don't worry... I'll tell you how to get around that. Fold the fabric in half with the 'wrong side' out and lay the t-shirt on it {Fig 1.}. The purpose of this is to get some idea of where the shoulders should be, and the length of the shirt.

Fold the sleeves into the shirt as best you can so the arm holes lie more or less flat. Turning it inside out sometimes helps with this. Mark an inch around the outside edge of the shirt using tailor's chalk, or soap for dark fabrics or a pencil for light fabrics. Only mark on the wrong/ugly side of the fabric if the two sides are different. Keep in mind how the t-shirt fits on you, remember that t-shirt fabric is stretchy so mark it wide enough, and that you want the pirate shirt to be long enough to be tucked in, and probably long enough to blouse it out a bit. Because of this I usually make it several inches longer than the t-shirt, you can always hem it later if it's too long. If you want a fuller shirt add several inches to the sides. When in doubt, always make it too big as it's easier to take the thing in than let it out. Make sure you mark the neck hole a half inch smaller than the neck hole on the back of the shirt as need a bit of seam allowance for the collar. Do the same on the front, the next step will ensure it will go over your head.
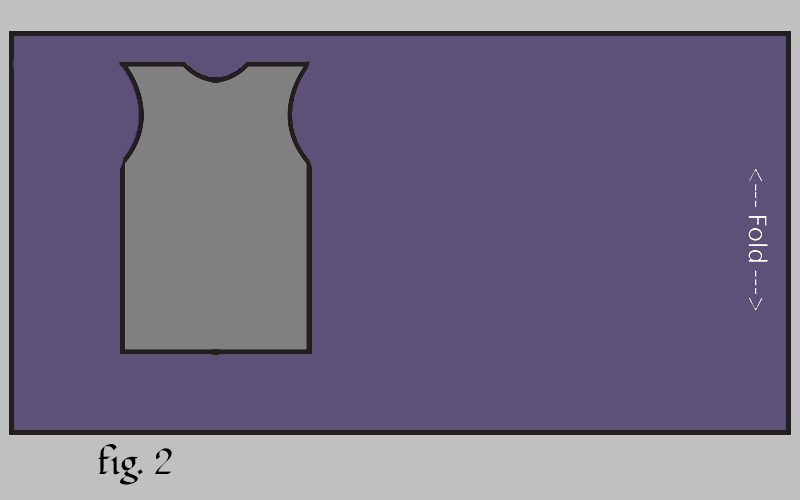
If the intended wearer is very heavy or the T-shirt fits close to the body and you may need to make the shirt much wider than the t-shirt. If too much fabric is hanging off the shoulders from the body of the shirt make the neck hole wider and put a pleat in the back of the neck hole before adding the collar. That will give more room in the body.
Cut the body of the pirate shirt out, and sew the shoulder seams. Using a ruler or other straight edge mark a line about 13-12 inches right down the front. It is very important that this goes straight down and is well centered. Measure on either side of the line to make sure it is dead center. I would mark it then hang the shirt and use a weighted string to make sure it's perfectly straight. Cut down the line.

Now pull the shirt on over your head wrong side out, (or the head of the intended wearer). Make sure the bottom of the shirt in the front and back is lining up together so you know it is sitting correctly. Put your arms straight out to the side, recheck the bottom is still lined up, and mark 3-4 inches below your armpit (depending on your size) on the shirt. I usually just pin the two side of the shirt together at this point. Take it off carefully and don't stick yourself with the pin! and baste from the bottom up to the pin, and then to the same point on the other side. Try it on again, to make sure you can move comfortably.
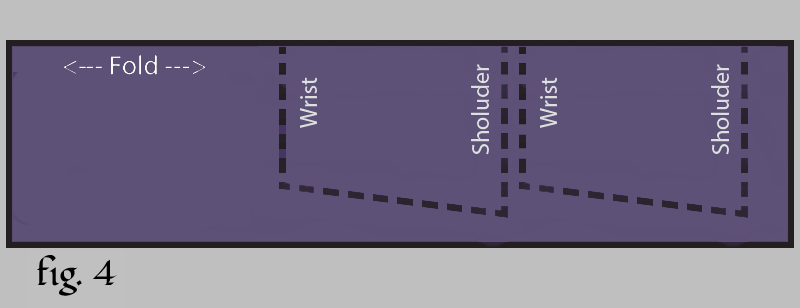
Now you will need to measure from your shoulder to the tips of your fingers. Don't worry if this measurement isn't exact, as long as you get within a few inches you'll be okay. This is how long the sleeves need to be. You don't want to just measure to your wrist because, in addition to being wider than normal sleeves, they need to be a bit longer in order to billow nicely. Now drape the measuring tape over your elbow with your arm stretched out. Pull the end, (the 0 mark), down to about where you want them to hang. Check where this corresponds to on the tape measure over your arm. Add an inch, that's how wide you want your sleeves to be. I usually just make them about a yard to 45 inches wide. Keep in mind really droopy sleeves are dramatic, but can also get in your way or be too dificult to get into narrow jacket sleeves and once they are sewn onto the shirt you will have to take the shirt apart in order to take them in.
Okay, unfold the fabric, and fold it lengthwise this time. Measure out your sleeve dimensions, and cut them out. Mark which are the length sides if it isn't a perfect square. If you have really poofy sleeves, angle up as you cut just a bit (a few inches) so you don't have quite so much excess fabric at the wrists, which can be a pain to tame and can look bulky.
Now sew the length sides together. You have to attach them to the body of the shirt. The tubes will be wider than the armholes, if not you have made a mistake somewhere, your armholes are probably too big or you didn't make the sleeves wide enough.
You are going to have to make the sleeves fit the holes, which will require some pleating. The easiest way to do this is to get some really heavy upholstery thread and a fat needle and sort of stitch in and out of the tube. Then Pull the thread till the tube will fit into the armholes and tie the thread off.
Pin the sleeve to the body where the body is inside out and the sleeve is right side out, but inside the shirt. The sleeve should just fit into the arm hole. When you pull the shirt right side out, the seam allowence should be inside the shirt and the sleeve... like it's supposed to be. If the topology of this seems a bit confusing, don't worry, it is. Make sure you baste the sleeve on before properly sewing it to the shirt to make sure everything is right side out.

Start sewing from the body seam under the armpit and work your way up preserving the gathering as you go. You will probably want the first few inches on either side of the armpit seam to have no gathering for reasons of comfort, excess fabric can be gathered up at the shoulder.
Once you get both sewn on try it on again. Get rubber bands and gather the sleeve at your wrist to sort of simulate how it will be when done. Make sure you are happy with the poof of the sleeves, because if you are going to take them in now is the time to do it!
Happy? Good, now you have the basic model and you have to decide how you want the sleeves. Going from easiest to most complex...
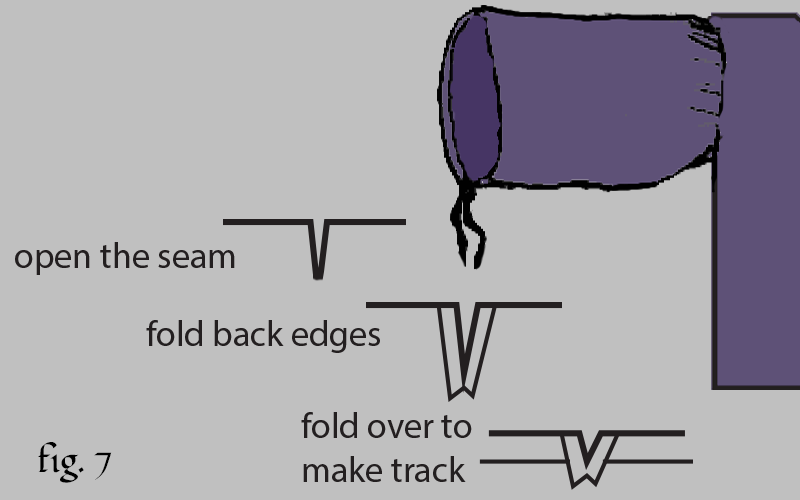
This is the easy way. Take out about an inch and a half of the end of the lengthwise seam at the wrist hole. Fold this back and stitch it (just so the fabric doesn't fray). Then fold about an inch over all the way around to make a track for the drawstring. Then pull the cord or ribbon through the track. I like to use a long bent wire with the ribbon taped to the end which I push through the track. You can also pull elastic through if you are worried about the ribbon ends getting in the way.
Cuffed Sleeves
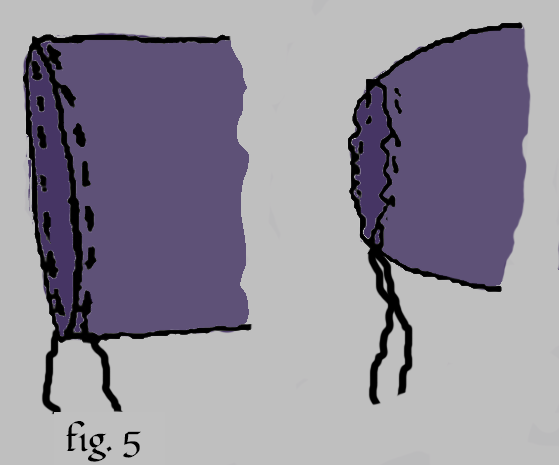
The easy way to do these is to get some blanket binding (for a satin like cuff), but you can also use a strip of fabric left over from the shirt. Cut the strip 3-4 inches wide and 3 inches longer than a comfortable measurement around your wrist. Take your fabric strip and fold in half so it's just as long and half as wide. Iron the crease in. Gather the sleeve at the cuff end like you did for the sleeve at the shoulder. Find the midpoint of the strip and the midpoint of the sleeve (opposite the seam), and start pinning it in. Stop about an inch from the sleeve seam and turn the ends of the cuff inside of itself. You will probably have to take out about an inch or two of the end of the lengthwise seam at the wrist hole so you can get your hand in and out of the sleeve. Turn the seam allowance back in and finish the edge (see the open the sleeves portion of Figure 7).
Now once you have it neatly lined up, pin it shut and iron the creases into it before closing with a neat stitch. Ironing the fold into place will let you see if it lines up well. You can close this easily with a button and loop (elastic usually works well). You can also make button holes (if you can do those) and use cufflinks, or cheat and sew snaps on the cuffs.
CAUTION! If you iron over the pins they will get very hot!
Ruffled Sleeves
There are several ways to do these. One is by using a self-ruffle, where you simply cut the sleeve long enough to cover your fingers and then make a track out of a strip of fabric 3-4 inches inside the sleeve (where your wrist should be) and ribbon or elastic is run through it.
Another way is to sew the elastic directly to the inside of the sleeve at wrist level. This is an easy way, but it's not the most durable method. If you decide to do this look for something called 'shirring tape' that can be found in the elastic section and can really come in handy (this stuff is great for skirt waists too). It looks like a multi-lane highway and starts off not having any stretch to it at all. There are elastic cords running through it, that once the fabric band its self is sewn on, can be pulled as tight as necessary. It also makes very evenly spaced gathers. The only issue here is you have to make sure the elastic threads you pull to give it stretch are really secured together well at the ends. If one lets loose it can ruin the whole effect.
My favorite way to put a ruffle on a shirt sleeve is to attach it to the cuff, you can either use the same fabric as the shirt or lace for the ruffle. In order to do this, instead of just folding the cuff fabric over make it with two pieces and sandwich the bottom of the ruffle and the edge of the sleeve between the two pieces. Each piece should be cut wider than just half of the folded over version and the edges should be folded under and finished before being attached. This is kind of fiddly. Pin and baste it first till you get the hang of it.
The ruffle should be about 2.5 times the length of the cuff. If you are using the shirt fabric, or lace that you will have to finish the edge of, cut the strip as a slight arc; the ruffles will come out better than if you just do a rectangle. I would then finish the outside curve, and ends by turning the very edge under and sewing. At this point you can start pleating the ruffle around the opening. Make the pleats as even as possible. You may have to do this more than once in order to get the hang of getting just the right amount of fabric in each pleat. Don't worry, everyone does.

Happy? Good, now you have to decide if you want a ruffle down the front. If you don't want one skip this section.
Ruffle Opening Finish
I usually like to put more than one layer of ruffle on the shirts I make, but that's just me going over the top. Feel free to join me if you wish. One well made layer is enough if that's all you want to do. You can either use the shirt fabric or lace for the ruffle. Lace often comes with a nice edge, which makes finishing a breeze.
You need to finish off the neck slit down the front. You can use strips of fabric left over from the shirt, or you can use blanket binding (or even leather), but it usually looks best if the collar, cuffs (if you have them), and front opening use the same material.
Cut two strips of fabric, or lace, 3 or 4 inches wide and 2.5 times the length of the neck slit. If you are using the shirt fabric, or lace that you will have to finish the edge of, cut the strip as a slight arc; the ruffles will come out better than if you just do a rectangle.
I would then finish the outside curve, and ends by turning the very edge under and sewing. At this point you can start pleating the ruffle down the opening. Make the pleats as even as possible. You may have to do this more than once in order to get the hang of getting just the right amount of fabric in each pleat. Top stitch over the pleats in the ruffles so it lays flat to the shirt and finish the edge of the opening.

Plain Opening Finish
You need to finish off the neck slit down the front. You can use strips of fabric left over from the shirt, or you can use blanket binding (or even leather), but it usually looks best if the collar, cuffs (if you have them), and front opening use the same material.
Measure from the neck down to the bottom of the slit. Cut 2 strips of fabric 3 inches wide and as long as the slit. Take your fabric strip and fold in half so it's just as long and half as wide. Iron the crease in. Fold the long edges of the strip in, and stitch to finish. Sandwich the shirt fabric in the strip. Sew near the crease straight up the edge, iron it to be sure everything is lined up, then sew along the finished edge. The point where the two strips can be finished neatly in the following ways. Simply fold the fabric under and stitch for the different shapes.

Buttons and Loops
I hate sewing button holes, I think they suck and if you are hell bent on making them more power to you, but you'll have to figure that out on your own. A more simple solution is to make loops of chord or elastic to go over the buttons. One shirt I did had a row of button on either side with loops going between them. Very New-Romanti-Goth!

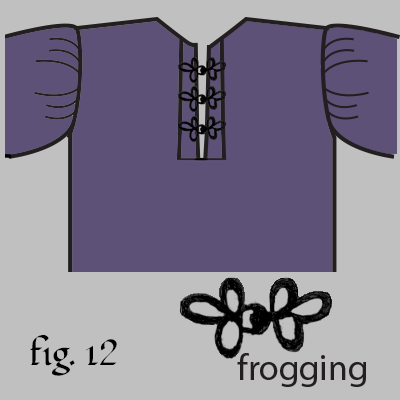
Frogging
You will need small frogs, the looped cord things you find near the buttons at the fabric store, not the amphibian.
Lace up
You'll want to make sure the sides of your neck opening are reinforced if you plan on doing this. Use grommets that have 2 pieces to them as they will be sturdier. Some machines will sew eyelets for you like round button holes. Again, I personally don't like doing these but it may be an option for you.
One of the nicest pirate shirts I ever made was done this way, but with leather. I took an inch wide strip of medium leather and glued it to the back of the opening fabric with flexible glue. After that I took a 2.5 inch wide piece of thinner leather and folded it over the edge, (if it doesn't want to lay flat at the bend put something heavy on it over night or pound it with a rubber mallet). I stitched it (by hand using a heavy needle) about a quarter of an inch in from the opening. I then folded the edge under, and stitched along that about as far in on both sides (a light application of glue can keep it folded while you sew, again with the heavy book trick if it doesn't want to stay put). I then set the grommets (there should be instructions with your Grommet kit). In order to make it look finished, cut a triangle of the thin leather so that it will fit right under the two leather pieces, fold in the edges and sew it on.

Shirt Collar
Now the collar. Regardless of how you want to finish the neckline you will be putting a band collar on last. You can either use a strip of the shirt fabric, or I sometimes use blanket binding for an easy satin like collar (which looks especially good if also done at the cuffs). For the fabric collar measure around the neck opening. Cut a strip of fabric 4 inches wide, and 2 inches longer than the neck opening. I would use some interfacing, which you can get at the fabric store, to make the collar a bit more stiff. Fusible interfacing can be cut to the same size as the fabric strip and ironed onto fabric that will stand ironing. This makes it easy.
Take your fabric strip and fold in half so it's just as long and half as wide. Iron the crease in. Find the midpoint of the strip and the midpoint of the back of the shirt, and start pinning it in. Stop about an inch from the neck slit (which should be finished by now) and turn the ends of the collar inside of itself.
Now once you have it neatly lined up, pin it shut and iron the creases into it before closing with a neat stitch. Ironing the fold into place will let you see if it lines up well. A small brooch looks great to close the collar if you put ruffles down the front, other wise it should be fine with a button and loop or left open.
CAUTION! If you iron over the pins they will get very hot!

Variations

Other ideas for making the shirt perfect for you might include using sheer fabric for the body and sleeves like lace, organza, burnout velvet, net, or mesh. This would give a very Romantic twist and make a great blouse to wear over a tank top or under a vest or corset.
These shirts can always be further embellished with venice lace appliques, beadwork, all sorts of things to give it a personal touch.