

Jabot & Cuffs
Sometimes you’d like a nice ruffle to feel extra fancy. Sometimes you don’t. Having removable neck and wrist ruffles gives you options, we like options here. For traveling it can completely change the look of an outfit while using minimal packing space.
Lace is probably what one thinks of first for this sort of thing but you can also use other light to med weight fabrics. If you made yourself a Pirate Shirt and you didn’t add ruffles there, you can add them now and use some of the same fabric you used on the shirt, always save your scraps!
Jabot
For the ‘collar’ that attaches around your neck you can use fabric, especially good if you are making this to match your pirate shirt but you can also use satin blanket binding or ribbon. I like to use velvet ribbon.
As far as closures go if you are using a wide ribbon, fabric band or blanket binding band you probably want to close it with a hook and eye or hook and bar. It should fit snugly over the collar of the shirt you will be wearing it with, without choking you. If you are using a more narrow ribbon you can just make the ribbon long enough to tie in the back which also allows for it to fit with more shirts or just around your neck.
First you need to make the back piece that will anchor whatever you are using for ruffles. Medium of heavy weight fabric will provide a good base. It should be a trapezoid 4 inches on top, 6.5 inches tall, with a 6 inch base. You can change these measurements based on how large you want to make your jabot but this is a good place to start. Measurements for the back piece include seam allowance. Cut it out on the fold, then finish the edges by turning them under and hemming them.

Next we need to make the ruffles. For an easy 3 layer jabot you will need the ruffle pieces to be about 4 inches tall. If you are using fabric that will have raw edges you need to cut it big enough to turn those edges under and finish them so you need to cut them 5 inches tall by 11, 13 and 15 inches long. Lace or other fabric with a pretty edge like eyelet is great for this, you just need to finish the top and sides. If you are using 4 inch lace trim only the sides will need to be finished.
Can’t find 4 inch lace trim? If you have lace trim that is more narrow just make more rows. Stagger the lengths evenly between the suggested 3.

If you are using lace or another fabric that doesn’t unravel you can skip finishing the edges. Just cut the length an inch less so 10”, 12”, 14".
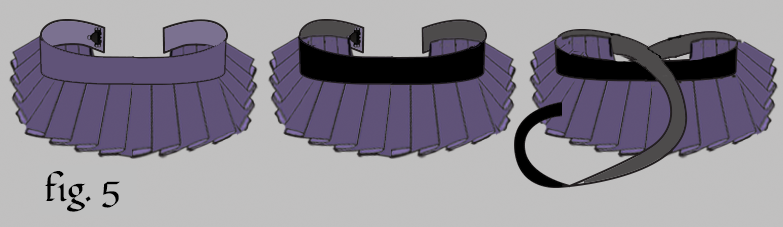
The next step is making the ruffles on the base fabric. Start with the bottom ruffle and attach it about a half inch from the bottom of the base. The middle row is halfway to the top and the top is… the top. If you are worried about getting your rows straight mark a line with soap or Tailor’s chalk for you to follow.
You can do all the pleats in one direction or pleat towards the center to make it more symmetrical which I like to do. Pin the pleats to the base fabric and sew over them before moving to the next layer. You probably won’t have the same number of pleats as in the diagram, it doesn’t matter. Just make them as even and symmetrical as you can.

Now you need to attach all this to the band that will go around your neck. Measure around your neck while wearing the shirt you intend to wear this with. If you are using some of the same fabric add 2 inches to that measurement. Decide how tall you want the band to be. Cut a piece of the fabric the length you got after adding 2 inches and twice the height you want it to be plus an inch. So if you want the band to be an inch tall, cut the fabric 3 inches tall. Now turn the edges in a half inch and iron those down. Fold it in half so it is the height you want and iron that too.
Pin the collar fabric to the ruffle assembly centering it. Stitch around all edges and attach your closure method.
For wide ribbon cut it the length you need, finish the edges and attach closure method.
For lighter ribbon just cut it long enough that you can tie it in the back and attach to the ruffle assembly.

Cuffs
The wrist band portion of these should probably match the collar of the jabot. Again hooks with eyes or bars are particularly good for these but they can also be tied with a ribbon or you can make a button hole and use a pretty button.. They need to be tight enough to not slip around but not uncomfortable.
Measure around the cuff of the shirt you will be wearing them over, or if you want to wear them under the cuff measure your wrists. Take this measurement and treat it like the collar portion of the jabot adding the seam allowance, doing the closure, etc.
Now triple the length of the wrist band and decide how long you want your cuff to be. Keeping the standard 4 inches of each of the neck ruffles is probably fine but you can adjust depending on your taste from making it more narrow to keep it out of the way.
Finish the edges as you did with the neck ruffle.
Now pleat the ruffle onto the back of the wrist band or sandwhich it in between if you are using the regular fabric doubled over method.
You can either call it good there or you can close the ruffle. If you want to close the ruffle start at the outer edge and sew the seam down leaving the last inch or so still open so you can get your hand in and out. I would suggest basting this first and testing to make sure you can get it on and take it off before sewing securely.
Now, do it again as I presume you want 2.
Easy to Get On & Off Version
If you have arthritis or another issue that would make it it difficult to use one of the above closures, or closing these just seems like a nightmare, there is another option… elastic! I don’t think these look quite as good as the above version but they are perfectly serviceable and a viable option.
The kind of elastic you will use depends on the the weight of the ruffle fabric. The lighter it is the lighter and thinner you can go on your elastic but I wouldn’t go more narrow than 1/2 inch. For ruffles to match the shirt fabric you will probably want stronger elastic.
Wrap your elastic, un-stretched or barely stretched depending on what you prefer around your wrist or the shirt cuff you will be wearing it with. Cut a piece of elastic this length plus an inch for seam allowance.
You want the ruffle to be cut the same length as above.
Do small pleats in your ruffle starting around the center which will sit on the top of your wrist until it is the length of your elastic stretched to the point it will go over your hand or a little more. You want the ruffles to be symmetrical from that center point.
Sew the ruffle to the elastic while it is stretched. Once it is all sewn down then close the ruffle all the way from the wrist to the bottom of the ruffle.
If you try on your cuff after sewing it and it’s more loose than you intended you probably didn’t use heavy enough elastic. It’s fine, just make a pleat or two starting around the closing seam till it fits, keeping in mind it still has to go over your hand.
If you are using lace that has a nice finished top edge you can sew the elastic about an inch down so there is a smaller ruffle pointing up your arm. Otherwise you may want to wear a bracelet or wristband over the top, though if you are neat enough it probably will be fine as is.
If you are wearing these with a satin or other slippery fabric and they will not stay put, use safety pins, which you can get in many colors now including black. Just pin from inside the sleeve and try to make them as unobtrusive as possible. If you have 2 small matching brooches or pretty pins they can be used on top to hold the cuffs in place and also look fancy.