
Pilgrim Bag
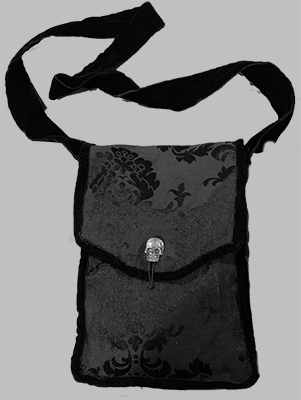
A Modern more fashionable take on a simple conveyance. I make these bags out of fabrics and even adapted this basic design to make leather back pack style bags, I will concentrate on the fabric version here. Adaptable to many sizes you can make these for evening bags, everyday bags, and anything you can think of.
First you need to decide how large you want your bag to be. If you are trying to fit something specific like a sketch pad or a phone when you measure don’t just measure length and width, measure one side as well so the depth is also taken into account. Even though the bag will have some depth to it, this ensures your item will fit. If you want a bag to hold more than just this, take that into account when deciding how big to make it.
So for this example my tablet in it’s case that makes it look like a book is 7 inches around one way and 10 inches the long way. I want to have enough room for my phone and some other personal items so I am going to add a few inches to both measurements. I am going to add 3 inches to each measurement, (to make room for my other stuff), plus one more for the seam allowance so the front panel of the bag needs to be 10 x 13 or 13 x 10 depending on if you want it longer or wider. I usually make them longer but if you want it more shaped like a letter envelope just cut and sew everything with that in mind.
We will start with the most simple version here so you need a front piece and a back piece that will also form the flap to close it. It also has a long piece that will serve as sides and bottom. We figured out the measurements for the front piece now for the back. The back should be double which ever measurement you are going to use as the flap so for the long version double the long measurement, for an envelope shaped bag double the narrow measurement. I usually shape the bottom of the flap when I cut it as it lays better than if you just leave it squared off.

For the longer piece that will for the sides and back you want it to be at least 2 inches wide add an inch for seam allowance so cut 3 inches wide. The length of this piece for the long bag is the length of the front piece (in this example 13) times 2 so 26, plus the width for the bottom for 10 inches so a total of 36 inches.
If you need to cut the long piece as 2 pieces remember to add half an inch to each half so you can sew them together. You will want to really reinforce where you join them.
Now lets talk fabrics. You want something on the heavier side with very little to no stretch. Upholstery fabric is a good choice, but heavier jacquard, brocade, velveteen, and canvas all work too. This will give the bag more structure and also help it hold up better to regular use.
I almost always line these bags. I tend to use some lighter like cotton broadcloth, taffeta, satin, silk, or anything pretty to add a little contrast to the outside color. Cut a front, back, and side of the lining as well.
Now I usually sew the lining pieces to their matching outside pieces right around the edge first before assembling so things don’t slip around on me. Pretty sides should be facing outward for both fabrics. If you have access to a serger or overlock machine it is ideal for this as it gives a nice finished edge that makes the whole process easier from here on out.
If you want more structure for the bag you can slip a piece of craft foam, some stiff vinyl, or leather between the outside and lining before sewing the last edge. I don’t recommend cardboard or anything else that can’t take a dose of spilled coffee or some rain. Either cut your insert the size of the front and back without the seam allowance, or make 2 fronts no seam allowance and use one for the back as well.
Lay the front piece onto the back piece and use tailor’s chalk or soap to mark where the top of the front hits. This will help make sure the side goes onto the back straight.

Sew the side to the front piece with the linings facing each other so the seam is on the outside. Sometimes I end up with a little bit extra of the long piece so after I attach it to the front I just whack any extra off. This happens depending on how you go around the corners of the front panel. If you round the bottom corners, which makes it easier to sew, you will almost definitely have a little extra. Don’t forget to round the back panel corners the same way if you do this.
Then sew the side to the back the same way so it matches up with the front. You may want to pin everything in place and baste first because if the side isn’t sewn just right the bag will be kind of twisted, and not in a good way.
For this version of the bag since I put the seams on the outside and then fold 1 inch ribbon or jacquard trim over the seams and sew that down. I usually use velveteen ribbon for the seams and wider velveteen ribbon for the strap. Don’t forget to cover all seams including around the opening and flap. I find the bags have more structural integrity this way.

Strap it on
Now figure out where you want the bag to hang and measure from the top of where you want the bag to be, over your shoulder and back down to the body of the bag. Keep in mind if you want to wear it over one shoulder, cross body, or to be able to do both. Adjust your measurements accordingly. For the wide ribbon strap cut 2 lengths of the ribbon and sew them together with the good sides out along the edge to make the strap a little more beefy. This works especially well with 2 inch velveteen ribbon.
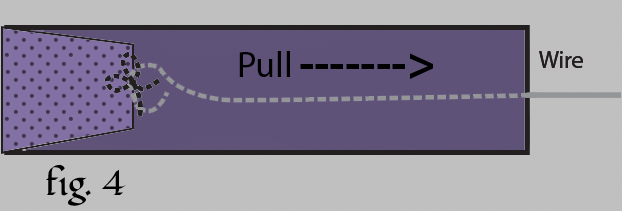
If you would prefer to use some of the outer fabric for the strap cut a piece the length you need ,(or if you need to do it in 2 pieces remember the extra seam allowance), add 4 inches so you have a tab on each end to attach to the bag. Sew this together along the length with wrong sides out, then turn the tube inside out. I like use a length of wire tacked to the edge of the fabric and pulled through the middle to turn it inside out.
If you fabric is really thick and stiff this is going to be the hardest part of your whole project. Just stick with it and take your time.
The other option is to do one strip of the outer fabric and one of the lining the width you want the strap to be plus an inch seam allowance. Turn the tube inside out as above and attach the strap so the lining is facing in and down.

Turn the ends just slightly into the tube of fabric or the ribbon tube and sew them flat so the bottom edges will be finished. Now attach the ends to the bag on each of the sides and secure them by stitching around the edges of the strap and sewing an ‘X’ as well to make sure it is secure.

Now you just need to decide how you want to secure the flap. You can use a button, frogging, a couple straps and buckles, or just a large snap under the flap. That is up to you.

Before putting on the closure you may want to stuff your bag so you can better see where both parts need to be.
Once you get the hang of these you can start adding pockets, which you want to add before you assemble. You can cut more than one of the front panels and sew it on with the back to make a tight back pocket the size of the bag which is great for tablets and sketch pads. Smaller pockets can go in the front back or sides. Just remember to finish off the top of the pocket panel with ribbon like you did the front, flap and seams.
In my bags I usually put a tight full sized back pocket and smaller pockets on the sides for my phone and a bottle of hot sauce.